Building a survey
Note: SMART Surveys is an add-on feature for Q2 SMART. If your FI is interested in SMART Surveys, contact your Q2 Relationship Manager.
Complete the following tasks to build a survey.
1. Select a campaign type
- On the Campaigns page, select Build campaign (
 ) to open the Campaign builder. Alternatively, you can select Build campaign from the Home page.
 - Below the Recommended campaigns list, select Build a custom campaign.
- Enter the name of the survey in the Campaign name field.
- From the What would you like to do? list, select Run a survey.
- From Survey topic, select the type of survey you want to create.
- Select Build this campaign.
2. Select a survey audience
- From the Target people who match list, select either any traits below or all traits below.
- To determine the target audience of the survey, select Add a trait to your audience. Then, select traits or a user list and select Add.
- For each trait, complete the additional options to further specify the target audience.
- (Optional) To include your entire user base in the survey, select Target all online banking users.
- (Optional) To exclude users from the survey audience, select Exclude people > Add an exclusion to this audience. Then, select an exclusion or user list from the lists provided.
- After you select the survey audience, select Next: Add / upload creatives.
Note: After you have added traits or a user list, you can view the audience size for the survey in the Overview section.
3. Upload creatives
- Under Survey trigger, select one or more calls to action that will launch the survey.
- If you choose to use a Banner - account tile as the survey trigger, complete the following steps:
- Select Click to add image.
- Choose an image from the library or select the Upload new ad tab to import your own image. Then, select Use ad.
- In the Alt Text field, describe the image or call to action for the visually impaired.
- If you choose to use Text and icon as the survey trigger, complete the following steps:
- Select Add icon.
- Select an icon from the library, and then select Use icon.
- In the Text field, enter the text that will appear next to the icon.
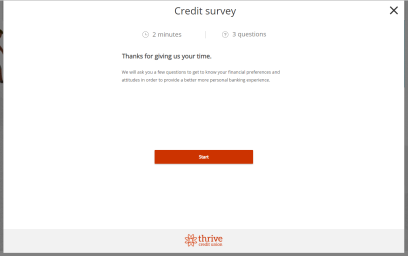
- Under Survey intro text, enter the Headline and Body text the user will see before they start the survey.
- Complete the following steps based on your survey type:
- Custom surveys
- Write your survey question. Survey questions must be written to allow for a Yes/No response.
- In the Trait Name field, write the name of the trait you want created based off of the end user's response.
- (Optional) Select Add a question to add another question to your survey.
Note: Avoid writing questions in a specific order. Survey questions display randomly.Note: The name you choose for the trait is permanent. We recommend selecting a name that you can use for future campaigns.Note: You can add up to three survey questions for custom surveys. - Other surveys
- From the Survey topic list, select the topic of the survey.
- Under Survey questions, select questions to include in the survey.
- Under Survey last page, enter the Headline and Body text the users will see upon completion of the survey.
- Select Next: Details.
4. Enter survey details
- On the next page, enter the survey details by completing the following fields:
- Start date and time—when ads begin appearing for users
- (Optional) End date and time—when ads stop appearing
- Select Next: Review campaign.
5. Review the survey
- Review the details of the survey, and then select Launch. Alternatively, select Save as draft to save the survey and return to it later.